在上一章容器启动过程的分析中,我们遗留了一些与事件发布机制相关的内容,涉及以下核心API:EventListenerMethodProcessor、DefaultEventListenerFactory、ApplicationEventPublisherAware、ApplicationListenerDetector、ApplicationEventMulticaster。本章将围绕Spring的事件机制进行深入解析。
本文内容:
定义事件监听器的几种方式解析
@EventListener注解工作原理的底层源码解析
ApplicationListener接口工作原理的底层源码解析
事件发布器发布事件过程底层源码解析
异步发布事件底层源码解析
自定义事件监听器与事件发布
我们可以自己定义监听器来实现对Spring发布事件的监听:
@Component
public class MyApplicationEventListener implements ApplicationListener<ApplicationEvent> {
    @Override
    public void onApplicationEvent(ApplicationEvent event) {
       System.out.println(event);
    }
}
指定的事件类型是ApplicationEvent,那么相当于会监听所有类型的事件。要注意的是ApplicationListener接口的泛型参数必须是ApplicationEvent类型。
之前我们分析Spring容器启动时提到过,容器启动后会发布一个ContextRefreshedEvent事件,当然我们可以通过容器对象自己发布一个事件。
public class Main {
    public static void main(String[] args) {
       AnnotationConfigApplicationContext applicationContext = new AnnotationConfigApplicationContext();
       applicationContext.register(MyConfig.class);
       applicationContext.refresh();

       applicationContext.publishEvent("123");

       UserService userService = (UserService) applicationContext.getBean("userService");
       userService.test();
    }
}
UserService代码如下:
@Component
public class UserService {

    public UserService() {
    }

    public void test() {
       // System.out.println("test...");
    }
}
运行结果:
org.springframework.context.event.ContextRefreshedEvent[source=org.springframework.context.annotation.AnnotationConfigApplicationContext@76fb509a, started on Sun Apr 26 18:34:15 CST 2026]
org.springframework.context.PayloadApplicationEvent[source=org.springframework.context.annotation.AnnotationConfigApplicationContext@76fb509a, started on Sun Apr 26 18:34:15 CST 2026]
可以看到,MyApplicationEventListener监听到了两个事件,一个是Spring内部自己发布的容器启动事件,一个是我们自己发布的事件。值得注意的是,我们发布的是一个字符串,Spring内部会默认包装成PayloadApplicationEvent事件类型(具体可分析publishEvent方法的源码)。
因此,我们可以修改一个MyApplicationEventListener事件监听器的监听事件的类型:
@Component
public class MyApplicationEventListener implements ApplicationListener<PayloadApplicationEvent<String>> {
    @Override
    public void onApplicationEvent(PayloadApplicationEvent<String> event) {
       System.out.println(event.getPayload());
    }
}
再次运行:
123可以看到,此时只监听到了我们自己发布的事件,并且我们可以获取到发布的内容。这里要注意的是,ContextRefreshedEvent它是继承了ApplicationContextEvent从而继承了ApplicationEvent,而PayloadApplicationEvent是直接继承了ApplicationEvent。
我们不妨再把监听的事件类型改一下:
@Component
public class MyApplicationEventListener implements ApplicationListener<ContextRefreshedEvent> {
    @Override
    public void onApplicationEvent(ContextRefreshedEvent event) {
       System.out.println(event);
    }
}
再次运行:
org.springframework.context.event.ContextRefreshedEvent[source=org.springframework.context.annotation.AnnotationConfigApplicationContext@300ffa5d, started on Sun Apr 26 18:43:08 CST 2026]此时就只监听到了容器启动的事件,不会监听我们自己发布的事件。
除了通过@Component的方式注册事件监听器,我们还可以利用容器对象注册事件监听器:
public class Main {
    public static void main(String[] args) {
       AnnotationConfigApplicationContext applicationContext = new AnnotationConfigApplicationContext();
       applicationContext.register(MyConfig.class);

       // 通过容器对象注册事件监听器
       applicationContext.addApplicationListener(new MyApplicationEventListener());

       applicationContext.refresh();

       applicationContext.publishEvent("123");

       UserService userService = (UserService) applicationContext.getBean("userService");
       userService.test();
    }
}
此时再运行代码:
org.springframework.context.event.ContextRefreshedEvent[source=org.springframework.context.annotation.AnnotationConfigApplicationContext@300ffa5d, started on Sun Apr 26 18:46:31 CST 2026]
org.springframework.context.event.ContextRefreshedEvent[source=org.springframework.context.annotation.AnnotationConfigApplicationContext@300ffa5d, started on Sun Apr 26 18:46:31 CST 2026]
会打印两次,这是因为有两个事情监听器都监听到了容器启动事件,一个是@Component注册的,一个是通过容器手动注册的。但要注意的是,这个过程容器启动事件只发布了一个。
initApplicationEventMulticaster方法源码解析
下面我们来看下refresh方法中的initApplicationEventMulticaster方法:
protected void initApplicationEventMulticaster() {
    ConfigurableListableBeanFactory beanFactory = getBeanFactory();
    // 处理程序员自定义的事件发布器
    if (beanFactory.containsLocalBean(APPLICATION_EVENT_MULTICASTER_BEAN_NAME)) {
       this.applicationEventMulticaster =
             beanFactory.getBean(APPLICATION_EVENT_MULTICASTER_BEAN_NAME, ApplicationEventMulticaster.class);
       if (logger.isTraceEnabled()) {
          logger.trace("Using ApplicationEventMulticaster [" + this.applicationEventMulticaster + "]");
       }
    }
    else {
       // 默认的事件发布器 - SimpleApplicationEventMulticaster
       this.applicationEventMulticaster = new SimpleApplicationEventMulticaster(beanFactory);
       // 注册到了单例池
       beanFactory.registerSingleton(APPLICATION_EVENT_MULTICASTER_BEAN_NAME, this.applicationEventMulticaster);
       if (logger.isTraceEnabled()) {
          logger.trace("No '" + APPLICATION_EVENT_MULTICASTER_BEAN_NAME + "' bean, using " +
                "[" + this.applicationEventMulticaster.getClass().getSimpleName() + "]");
       }
    }
}从这就可以知道Spring在容器启动时,创建非懒加载单例Bean之前,就往单例池中放了一个ApplicationEventMulticaster类型的Bean。因此,我们在业务类中也可以这样使用:
@Component
public class OrderService {

    @Autowired
    ApplicationEventMulticaster applicationEventMulticaster;

    public void test() {
       // PayloadApplicationEvent构造方法第一个参数是事件源对象,意思是就是发布者对象
       applicationEventMulticaster.multicastEvent(new PayloadApplicationEvent<>(this, "123123"));
    }

}
这个相当于是利用底层的事件广播器发布事件。你也可以注入ApplicationEventPublisher,但这个实际注入的是容器对象,但它有提供publishEvent方法,你可以直接发布数据,而不需要自己包装成事件对象。但要注意的是,开发中推荐使用ApplicationEventPublisher,因为
ApplicationEventPublisher.publishEvent()最后还是调用了ApplicationEventMulticaster.multicastEvent()
@Component
public class MyApplicationEventListener implements ApplicationListener<ApplicationEvent> {
    @Override
    public void onApplicationEvent(ApplicationEvent event) {
       System.out.println(event);
    }
}
public class Main {
public static void main(String[] args) {
AnnotationConfigApplicationContext applicationContext = new AnnotationConfigApplicationContext();
applicationContext.register(MyConfig.class);
// 通过容器对象注册事件监听器
applicationContext.addApplicationListener(new MyApplicationEventListener());
applicationContext.refresh();
// applicationContext.publishEvent("123");
OrderService orderService = (OrderService) applicationContext.getBean("orderService");
orderService.test();
}
}运行结果:
org.springframework.context.event.ContextRefreshedEvent[source=org.springframework.context.annotation.AnnotationConfigApplicationContext@76fb509a, started on Sun Apr 26 19:04:57 CST 2026]
org.springframework.context.event.ContextRefreshedEvent[source=org.springframework.context.annotation.AnnotationConfigApplicationContext@76fb509a, started on Sun Apr 26 19:04:57 CST 2026]
org.springframework.context.PayloadApplicationEvent[source=com.hexon.service.OrderService@4f933fd1]
org.springframework.context.PayloadApplicationEvent[source=com.hexon.service.OrderService@4f933fd1]
监听到了4次,因为上面的代码共发布了两个事件并且定义了两个监听器,一个是refresh内部本身发布的容器启动事件,一个是orderService#test方法内部手动发布的PayloadApplicationEvent事件。
看到这里,站在架构设计的角度,我会想:为什么Spring有了事件发布器,还要搞一个事件广播器呢?这不是多了一层么?
具体的分析见扩展笔记:《Spring 事件机制深度解析》
registerListeners方法源码解析
在refresh方法中的invokeBeanFactoryPostProcessors会去扫描Bean,那么我们通过@Component定义的事件监听器也会在这一步被扫描到是一个Bean。而后面的registerListeners方法就会去收集客户端程序员自己定义的事件监听器。
protected void registerListeners() {
// Register statically specified listeners first.
// 获取通过 applicationContext.addApplicationListener() 手动添加的监听器实例
for (ApplicationListener<?> listener : getApplicationListeners()) {
// 直接将实例添加到广播器的 defaultRetriever.applicationListeners 中
getApplicationEventMulticaster().addApplicationListener(listener);
}
// Do not initialize FactoryBeans here: We need to leave all regular beans
// uninitialized to let post-processors apply to them!
// 从容器中获取所有实现了 ApplicationListener 接口的 Bean 名称(此时仅获取名字,不实例化)
/*
注意:allowEagerInit传递的是false,这意味着只看FactoryBean本身类型,不会去问getObjectType(),更不会调用getObject()
FactoryBean 主要是为了整合其它框架,所以Spring刻意在类型筛选阶段排除了它们,避免过早初始化第三方重量级对象。
后续虽由 ApplicationListenerDetector 作为补偿机制,将 FactoryBean 生成的监听器加入容器,
但由于它发生在 finishBeanFactoryInitialization() 阶段(在 registerListeners() 之后),
因此 FactoryBean 生产的监听器注定无法接收到 earlyApplicationEvents(早期事件)。
*/
String[] listenerBeanNames = getBeanNamesForType(ApplicationListener.class, true, false);
for (String listenerBeanName : listenerBeanNames) {
// 此处仅将监听器的 Bean 名称注册到多播器,不立即实例化。
// 这样做是为了将“实例化权限”委托给 multicastEvent 执行时的过滤逻辑:
// 只有匹配当前实际发生事件类型的监听器,才会通过 getBean() 被创建;
// 那些与当前事件无关的监听器(即使数量很多)则会被跳过,避免不必要的资源开销。
// (虽然本方法后续处理 earlyApplicationEvents 时会立即触发一次创建,但这依然是按需过滤后的精准创建,而非全量创建。)
getApplicationEventMulticaster().addApplicationListenerBean(listenerBeanName);
}
/*
* 在容器刷新过程中,在 registerListeners() 方法执行之前,如果有代码尝试发布事件,这些事件无法被正常广播
* (因为此时事件广播器可能还没初始化完成),它们会被临时存储在 this.earlyApplicationEvents 集合中。
* 作用:确保在容器刷新早期发布的事件不会被丢失,等到监听器都注册完毕后,统一把这些"迟到"的事件重新广播一遍。
* 比如你在BeanPostProcessor#postProcessAfterInitialization中发布事件
*/
// Publish early application events now that we finally have a multicaster...
Set<ApplicationEvent> earlyEventsToProcess = this.earlyApplicationEvents;
// earlyApplicationEvents 是一个"临时标志位",它在 registerListeners() 之前存在,之后永久为 null。
// 所以在publishEvent中 != null 的判断天然地区分了"早期"和"正常"两个阶段。(监听器是否注册完成前就是early)
this.earlyApplicationEvents = null;
// 本质上就是为了防止监听器监听不到自己被注册之前发布的事件
if (!CollectionUtils.isEmpty(earlyEventsToProcess)) {
for (ApplicationEvent earlyEvent : earlyEventsToProcess) {
getApplicationEventMulticaster().multicastEvent(earlyEvent);
}
}
}这个地方有几个点关注下:
1、FactoryBean的处理,无法监听早期事件
2、先收集名称,在事件真的发布的时候会先匹配事件类型,再去创建监听器的对象。
3、earlyApplicationEvents(早期事件)的监听情况
扩展:根据源码分析事件的处理情况
基本常识
这里我们先来具体看下在容器refresh前发布事件和注册事件监听器的情况:
@Component
public class MyApplicationEventListener implements ApplicationListener<PayloadApplicationEvent<String>> {
    @Override
    public void onApplicationEvent(PayloadApplicationEvent<String> event) {
        System.out.println(event.getPayload());
    }
}
public class Main {
public static void main(String[] args) {
AnnotationConfigApplicationContext applicationContext = new AnnotationConfigApplicationContext();
applicationContext.register(MyConfig.class);
applicationContext.publishEvent("123"); // 容器refresh前发布事件
applicationContext.refresh();
UserService userService = (UserService) applicationContext.getBean("userService");
userService.test();
}
}这时是无法监听到事件的,调试publishEvent方法可以知道,这个事件根本没有被收集。
由此可见,在 Spring 容器 refresh() 之前发布的事件,会被直接丢弃,监听器无法收到。
但事件监听器可以在容器refresh前注册:
public class Main {
public static void main(String[] args) {
AnnotationConfigApplicationContext applicationContext = new AnnotationConfigApplicationContext();
applicationContext.register(MyConfig.class);
applicationContext.addApplicationListener(new MyApplicationEventListener());
applicationContext.refresh();
// applicationContext.addApplicationListener(new MyApplicationEventListener()); // 只要在事件发布前注册即可
applicationContext.publishEvent("123");
UserService userService = (UserService) applicationContext.getBean("userService");
userService.test();
}
}看下
addApplicationListener方法的源码就知道了
早期事件
所谓的早期事件,应该是earlyApplicationEvents属性初始化后(即prepareRefresh()后),registerListeners()方法执行前,这中间发布的事件。(早期事件在 prepareRefresh() 之后发布并暂存,在 registerListeners() 执行期间被消费。)
通过源码分析我们可以推测出以下结论:
实现
ApplicationListener接口的监听器可以监听早期事件如果是通过
FactoryBean方式注册的Bean,Spring只会判断FactoryBean类本身是否实现了ApplicationListener接口,不会去判断getObject和getObjectType的类型。(当然这里我只能从早期事件处理看出是不会的,但其实经过验证后面也不会将getObject()生产出来的对象添加到事件监听机制中)通过@EventListener方式是无法监听早期事件的
我们先来看一个非早期事件的情况:
//@Component
public class MyApplicationEventListener implements ApplicationListener<PayloadApplicationEvent<String>> {
    @Override
    public void onApplicationEvent(PayloadApplicationEvent<String> event) {
        System.out.println(event.getPayload());
    }
}
public class Main {
public static void main(String[] args) {
AnnotationConfigApplicationContext applicationContext = new AnnotationConfigApplicationContext();
applicationContext.register(MyConfig.class);
applicationContext.addApplicationListener(new MyApplicationEventListener());
applicationContext.refresh();
applicationContext.publishEvent("123");
UserService userService = (UserService) applicationContext.getBean("userService");
userService.test();
System.out.println(applicationContext.getBean("myFactoryBean"));
}
}@Component
public class UserService {
public void test() {
System.out.println("test...");
}
@EventListener
public void a(PayloadApplicationEvent<String> event) {
System.out.println(event.getPayload());
}
}@Component
public class MyFactoryBean implements FactoryBean<MyApplicationEventListener> {
@Override
public MyApplicationEventListener getObject() throws Exception {
return new MyApplicationEventListener();
}
@Override
public Class<?> getObjectType() {
return MyApplicationEventListener.class;
}
}此时执行结果:
123
123
test...
com.hexon.MyApplicationEventListener@4678c730只有两个监听到了,分别是手动增加的MyApplicationEventListener和UserService的加了@EventListener的a()方法。
当然如果
MyFactoryBean也实现ApplicationListener<PayloadApplicationEvent<String>>就会监听3次。
关于,FactoryBean无法监听非早期事件,我想是不是因为懒加载的问题,于是改用SmartFactoryBean接口:
@Component
public class MyFactoryBean implements SmartFactoryBean<MyApplicationEventListener> {
@Override
public MyApplicationEventListener getObject() throws Exception {
return new MyApplicationEventListener();
}
@Override
public Class<?> getObjectType() {
return MyApplicationEventListener.class;
}
@Override
public boolean isEagerInit() {
return true;
}
}结果依然是无法监听,因此我猜测,根本就没有把这个监听器收集到事件广播器中。
FactoryBean通过getObject()生产出来的对象,与事件系统的监听器注册机制没有半毛钱关系。只是前面源码中有一个
allowEagerInit=false的参数,来控制获取根据Bean类型来获取BeanName的情况。但
FactoryBean本身(如果它实现了ApplicationListener)是可以和事件系统有关系的。
下面再来看早期事件的情况。
增加一个ApplicationEventPublisherAware,便于模拟早期事件(在refresh#registerBeanPostProcessors()中触发):
@Component
public class MyBeanPostProcessor implements BeanPostProcessor, ApplicationEventPublisherAware {
private ApplicationEventPublisher publisher;
// ★ 这个 setter 方法在 registerBeanPostProcessors() 阶段被调用!
// 此时 registerListeners() 还没执行,earlyApplicationEvents 还存在。
@Override
public void setApplicationEventPublisher(ApplicationEventPublisher publisher) {
this.publisher = publisher;
// 在这里发布事件 -> 因为时间极早,会被存入 earlyApplicationEvents 集合
this.publisher.publishEvent("BPP被实例化了!");
}
@Override
public Object postProcessAfterInitialization(Object bean, String beanName) {
// ★ 这个方法在 finishBeanFactoryInitialization() 阶段才执行
// 此时 earlyApplicationEvents 已经是 null,这里发布的是“普通事件”
this.publisher.publishEvent(beanName + " 初始化完成");
return bean;
}
}此时把通过容器发布的事件注释:
public class Main {
public static void main(String[] args) {
AnnotationConfigApplicationContext applicationContext = new AnnotationConfigApplicationContext();
applicationContext.register(MyConfig.class);
applicationContext.addApplicationListener(new MyApplicationEventListener()); // 必须在refresh前
applicationContext.refresh();
// applicationContext.publishEvent("123");
UserService userService = (UserService) applicationContext.getBean("userService");
userService.test();
}
}同时把
FactoryBean获取的代码删除,将MyFactoryBean类删除
其他的源码保持不动,仍然没有给MyApplicationEventListener加@Component,但要注意的是addApplicationListener要在refresh之前(其实就是在registerListeners之前)才能生效。
运行结果:
BPP被实例化了!
myConfig 初始化完成
userService 初始化完成
test...如果把MyApplicationEventListener加上@Component,运行结果:
myApplicationEventListener 初始化完成
myApplicationEventListener 初始化完成
BPP被实例化了!
BPP被实例化了!
myConfig 初始化完成
myConfig 初始化完成
userService 初始化完成
userService 初始化完成
test...由此,我们验证了@EventListener是无法监听早期事件的。
publishEvent方法源码解析
下面我们来分析发布事件的方法。
public class Main {
    public static void main(String[] args) {
       AnnotationConfigApplicationContext applicationContext = new AnnotationConfigApplicationContext();
       applicationContext.register(MyConfig.class);

       // 通过容器对象注册事件监听器
       applicationContext.addApplicationListener(new MyApplicationEventListener());

       applicationContext.refresh();

       applicationContext.publishEvent("123");  // 断点

//     OrderService orderService = (OrderService) applicationContext.getBean("orderService");
//     orderService.test();
    }
}
调用链路:
1、publishEvent方法
org.springframework.context.support.AbstractApplicationContext#publishEvent(java.lang.Object, org.springframework.core.ResolvableType)此方法中会处理:包装成PayloadApplicationEvent、早期事件收集、真正发布事件,其中真正发布事件还是依赖事件广播器。
2、multicastEvent方法
org.springframework.context.event.SimpleApplicationEventMulticaster#multicastEvent(org.springframework.context.ApplicationEvent, org.springframework.core.ResolvableType)此方法中会调用getApplicationListeners(event, type)获取到所有的事件监听器,再去执行,而且还可以异步执行。
3、getApplicationListeners方法
org.springframework.context.event.AbstractApplicationEventMulticaster#getApplicationListeners(org.springframework.context.ApplicationEvent, org.springframework.core.ResolvableType)此方法是关键是最终返回事件监听器列表的,上面有些缓存的逻辑,我们先跳过(有时间再细看),最终会执行retrieveApplicationListeners。
4、retrieveApplicationListeners方法
org.springframework.context.event.AbstractApplicationEventMulticaster#retrieveApplicationListeners此方法会进行事件类型过滤(具体是在supportsEvent方法,这个方法有时间再阅读),并且会根据根据@Order注解或者Ordered接口排序事件监听器。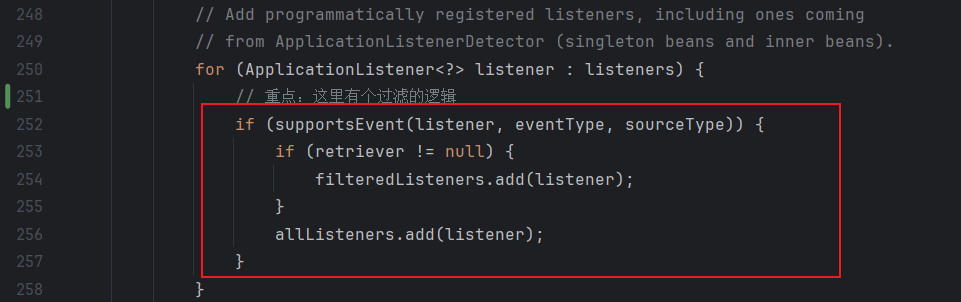
这里目前我们只要知道它会根据事件类型过滤即可。可以将监听事件类型改成ContextRefreshedEvent后再调试,看下过滤的逻辑:
@Component
public class MyApplicationEventListener implements ApplicationListener<ContextRefreshedEvent> {
    @Override
    public void onApplicationEvent(ContextRefreshedEvent event) {
       System.out.println(event);
    }
}
从上面源码分析,至少要明白两个点,一个是可以控制事件监听器的顺序,一个是可以异步发布事件。
下面我们来看看异步事件。
异步事件配置
在默认什么都没有设置的情况下:
public class Main {
    public static void main(String[] args) {
       AnnotationConfigApplicationContext applicationContext = new AnnotationConfigApplicationContext();
       applicationContext.register(MyConfig.class);

       // 通过容器对象注册事件监听器
       applicationContext.addApplicationListener(new MyApplicationEventListener());

       applicationContext.refresh();

       applicationContext.publishEvent("123");

//     OrderService orderService = (OrderService) applicationContext.getBean("orderService");
//     orderService.test();
    }
}
@Component
public class MyApplicationEventListener implements ApplicationListener<ContextRefreshedEvent> {
@Override
public void onApplicationEvent(ContextRefreshedEvent event) {
System.out.println(Thread.currentThread().getName() + ":" + event);
}
}运行结果:
main:org.springframework.context.event.ContextRefreshedEvent[source=org.springframework.context.annotation.AnnotationConfigApplicationContext@76fb509a, started on Sun Apr 26 20:04:33 CST 2026]
main:org.springframework.context.event.ContextRefreshedEvent[source=org.springframework.context.annotation.AnnotationConfigApplicationContext@76fb509a, started on Sun Apr 26 20:04:33 CST 2026]
可以看到默认就是主线程。下面我们手动配置一下事件广播器的线程池:
@ComponentScan
public class MyConfig {

    @Bean
    public ApplicationEventMulticaster applicationEventMulticaster() {
       SimpleApplicationEventMulticaster simpleApplicationEventMulticaster = new SimpleApplicationEventMulticaster();
       simpleApplicationEventMulticaster.setTaskExecutor(Executors.newFixedThreadPool(5));
       return simpleApplicationEventMulticaster;
    }

}
再次运行:
pool-1-thread-2:org.springframework.context.event.ContextRefreshedEvent[source=org.springframework.context.annotation.AnnotationConfigApplicationContext@76fb509a, started on Sun Apr 26 20:10:26 CST 2026]
pool-1-thread-1:org.springframework.context.event.ContextRefreshedEvent[source=org.springframework.context.annotation.AnnotationConfigApplicationContext@76fb509a, started on Sun Apr 26 20:10:26 CST 2026]
这个配置我们其实是从源码中读取到的,它的beanName必须是applicationEventMulticaster,如果我们修改一下:
@ComponentScan
public class MyConfig {

    @Bean
    public ApplicationEventMulticaster xxx() {
       SimpleApplicationEventMulticaster simpleApplicationEventMulticaster = new SimpleApplicationEventMulticaster();
       simpleApplicationEventMulticaster.setTaskExecutor(Executors.newFixedThreadPool(5));
       return simpleApplicationEventMulticaster;
    }

}
再次运行:
main:org.springframework.context.event.ContextRefreshedEvent[source=org.springframework.context.annotation.AnnotationConfigApplicationContext@300ffa5d, started on Sun Apr 26 20:11:54 CST 2026]
main:org.springframework.context.event.ContextRefreshedEvent[source=org.springframework.context.annotation.AnnotationConfigApplicationContext@300ffa5d, started on Sun Apr 26 20:11:54 CST 2026]
发现是没有以异步的方式执行,因为我们initApplicationEventMulticaster方法中明确指定了beanName必须是applicationEventMulticaster。通过这里可以了解的是,容器默认都是通过applicationEventMulticaster去注册与发布事件的。
下面来看一段代码:
@Component
public class MyApplicationEventListener implements ApplicationListener<PayloadApplicationEvent<String>> {
    @Override
    public void onApplicationEvent(PayloadApplicationEvent<String> event) {
       System.out.println(Thread.currentThread().getName() + ":" + event.getPayload());
    }
}
@ComponentScan
public class MyConfig {
@Bean
public ApplicationEventMulticaster xxx() {
SimpleApplicationEventMulticaster simpleApplicationEventMulticaster = new SimpleApplicationEventMulticaster();
simpleApplicationEventMulticaster.setTaskExecutor(Executors.newFixedThreadPool(5));
return simpleApplicationEventMulticaster;
}
}@Component
public class OrderService {
@Autowired
ApplicationEventMulticaster xxx;
public void test() {
// PayloadApplicationEvent构造方法第一个参数是事件源对象,意思是就是发布者对象
xxx.multicastEvent(new PayloadApplicationEvent<>(this, "123123"));
}
}public class Main {
public static void main(String[] args) {
AnnotationConfigApplicationContext applicationContext = new AnnotationConfigApplicationContext();
applicationContext.register(MyConfig.class);
// 通过容器对象注册事件监听器
applicationContext.addApplicationListener(new MyApplicationEventListener());
applicationContext.refresh();
// applicationContext.publishEvent("123");
OrderService orderService = (OrderService) applicationContext.getBean("orderService");
orderService.test();
}
}此时运行代码,发现没有监听到任何事件,此时你可能会懵逼。这是因为refresh方法中的注册监听器都是以applicationEventMulticaster这个bean做的,观察下initApplicationEventMulticaster方法的源码,我们定义了一个xxx的事件广播器,Spring内部并不认。但是我们可以自己给xxx注册事件监听器:
@ComponentScan
public class MyConfig {

    @Bean
    public ApplicationEventMulticaster xxx() {
       SimpleApplicationEventMulticaster simpleApplicationEventMulticaster = new SimpleApplicationEventMulticaster();
       simpleApplicationEventMulticaster.setTaskExecutor(Executors.newFixedThreadPool(5));
       // 注册事件监听器
       simpleApplicationEventMulticaster.addApplicationListener(new MyApplicationEventListener());
       return simpleApplicationEventMulticaster;
    }

}
此时再运行:
pool-1-thread-1:123123ApplicationListenerDetector详解
ApplicationListenerDetector是一个BeanPostProcessor ,它的初始化后方法里会去真正的收集事件监听器。
前面我们在分析registerListeners方法时,有一个很重要的细节,那就是对于@Component注册的事件监听器它只收集了beanName。
ApplicationListenerDetector就是负责补充的,另外我们注意到事件监听器的Bean必须是单例的才会被收集,因为事件监听器本质上是"策略/观察者",应该是无状态的、全局唯一的。
具体看
org.springframework.context.support.ApplicationListenerDetector#postProcessAfterInitialization源码。
通过@EventListener定义事件监听
我们还可以将@EventListener标注在一个Bean的方法上实现事件监听。
先将代码进行调整,删除MyApplicationEventListener自定义事件监听器。
@ComponentScan
public class MyConfig {

}
public class Main {
public static void main(String[] args) {
AnnotationConfigApplicationContext applicationContext = new AnnotationConfigApplicationContext();
applicationContext.register(MyConfig.class);
applicationContext.refresh();
applicationContext.publishEvent("123");
}
}使用@EventListener定义事件监听:
@Component
public class UserService {

    public void test() {
       // System.out.println("test...");
    }

    @EventListener
    public void a(ApplicationEvent event) {
       System.out.println(event);
    }
}
运行结果:
org.springframework.context.event.ContextRefreshedEvent[source=org.springframework.context.annotation.AnnotationConfigApplicationContext@300ffa5d, started on Sun Apr 26 21:24:51 CST 2026]
org.springframework.context.PayloadApplicationEvent[source=org.springframework.context.annotation.AnnotationConfigApplicationContext@300ffa5d, started on Sun Apr 26 21:24:51 CST 2026]
当然也可以定义多个:
@Component
public class UserService {

    public void test() {
       // System.out.println("test...");
    }

    @EventListener
    public void a(ContextRefreshedEvent event) {
       System.out.println(event);
    }

    @EventListener
    public void b(ApplicationEvent event) {
       System.out.println(event);
    }
}
输出:
org.springframework.context.event.ContextRefreshedEvent[source=org.springframework.context.annotation.AnnotationConfigApplicationContext@300ffa5d, started on Sun Apr 26 21:26:11 CST 2026]
org.springframework.context.event.ContextRefreshedEvent[source=org.springframework.context.annotation.AnnotationConfigApplicationContext@300ffa5d, started on Sun Apr 26 21:26:11 CST 2026]
org.springframework.context.PayloadApplicationEvent[source=org.springframework.context.annotation.AnnotationConfigApplicationContext@300ffa5d, started on Sun Apr 26 21:26:11 CST 2026]下面我们来分析下@EventListener的工作原理。
EventListenerMethodProcessor和DefaultEventListenerFactory详解
首先EventListenerMethodProcessor是一个SmartInitializingSingleton,在我们之前的学习中有看过,它是在所有非懒加载的单例Bean创建完成后,会调用判断每个非懒加载的单例 Bean是不是实现了SmartInitializingSingleton接口,实现了就会调用SmartInitializingSingleton#afterSingletonsInstantiated方法。在上一章容器启动的过程中,我们说过Spring默认是将EventListenerMethodProcessor注册到了单例池中。
另外,这两个添加的时机非常早,在
new AnnotatedBeanDefinitionReader()时通过AnnotationConfigUtils.registerAnnotationConfigProcessors(this.registry);添加的
下面我们大概分析下源码:
org.springframework.context.event.EventListenerMethodProcessor#afterSingletonsInstantiated --->
org.springframework.context.event.EventListenerMethodProcessor#processBean --->
org.springframework.context.event.EventListenerFactory#createApplicationListener
总结: 1、通过EventListenerMethodProcessor找到所有Bean的@EventListener 的方法 2、利用DefaultEventListenerFactory使用适配器模式将@EventListener 的方法生成ApplicationListener对象,并添加到容器中。
这里只看了一个主线逻辑,要知道的是
EventListenerFactory可以自定义,目前没有还看到使用场景。
总结
Spring 事件机制的设计非常精妙,融合了多种经典设计模式,充分体现了框架设计的优雅与扩展性。目前我们仅梳理了主干流程,但源码中诸多实现细节同样极具学习价值。此外,关于事务事件(如 @TransactionalEventListener)的部分尚未深入探究,待后续学完声明式事务后,有必要回过头来结合源码进行巩固。路漫漫其修远兮,继续加油!