本文内容:
Git简介
集中式与分布式两种版本管理的区别
安装Git
使用Git之前需要做的最小配置
创建Git本地仓库并配置local用户信息
辅助配置
Git简介
Git 是一个 分布式版本控制系统,用于高效管理项目的代码和文件变更。它的核心功能可以简单总结为:
记录历史
保存每次代码修改的“快照”,可随时回溯到任意版本。多人协作
允许多人在同一项目并行开发,合并代码时自动处理冲突。分支管理
轻松创建独立分支(如开发新功能或修复Bug),完成后合并到主分支。代码备份
每个开发者都拥有完整的代码仓库副本,避免单点故障。
常用命令示例:
git init:初始化仓库git add [文件/目录]:添加修改至暂存区。git commit -m"描述":提交变更到本地仓库git push:推送代码到远程仓库(如GitHub)git pull:获取他人更新的代码
本质:Git 是程序员管理代码变更的“时间机器”+“协作工具”。
但Git也不一定是程序员的工具,产品文档等资料也可以用Git托管。
特点:
最优的存储能力
非凡的性能
开源的
很容易做备份
支持离线操作
很容易定制工作流程
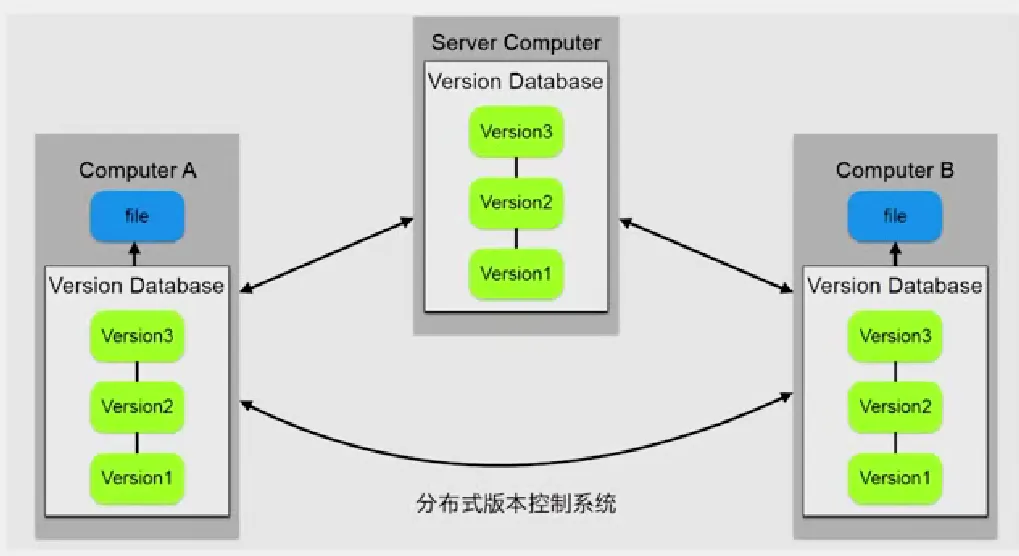
集中式 VS 分布式
以下是集中式版本管理系统与分布式版本管理系统的区别:
安装Git
官网地址:Git - 安装Git
选择对应的操作系统安装即可,这里以windows安装为例:Git - Win
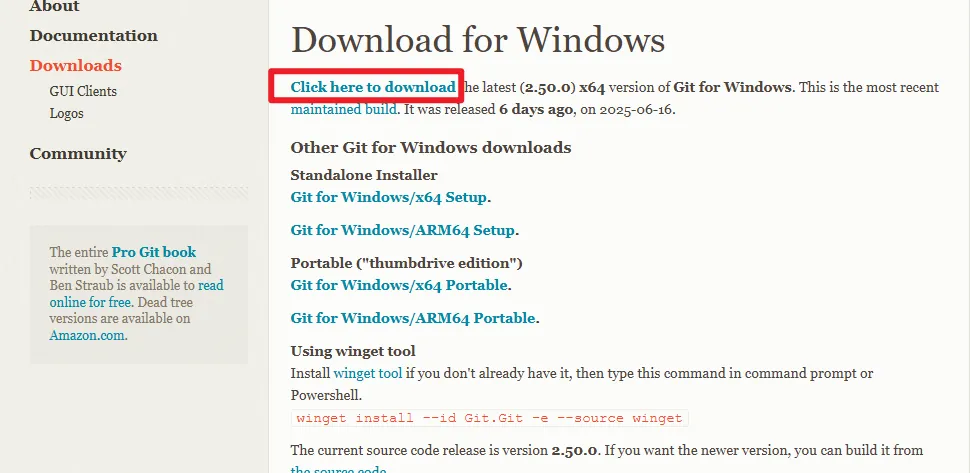
安装的过程全部都应用默认选项即可,但是windows用户建议修改下安装的路径。
使用Git之前需要做的最小配置
配置 user 信息
配置 user.name 和 user.email
git config --global user.name 'your_name'
git config --global user.email 'your_email@domain.com'
config的三个作用域
缺省等同于 local
# local 只针对某个仓库有效(必须在.git仓库目录中执行,具体效果后面介绍)
git config --local
# global针对当前用户所有仓库有效
git config --global
# system对系统所有登录的用户有效(几乎不用)
git config --system
显示 config 所有配置,加 --list(如果不加作用域,会显示三个作用域的配置)
git config --list --local
git config --list --global
git config --list --system
显示单个配置:
# 也可以查看单个配置项
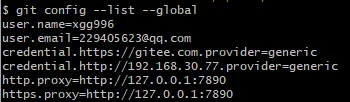
git config --global user.name我本地的配置如下:
创建Git本地仓库并配置local用户信息
两种场景:
把已有的项目代码纳入Git管理
cd 项目代码所有在的文件夹(项目的根目录)
git init
新建项目直接使用Git管理
cd 某个文件夹(通常是workspace)
git init your_project  # 会在当前路径下创建和项目名称相同名的文件夹
cd your_project  # 可以看到此目录里有一个隐藏的.git目录
下面看一个实操,我会从零用Git初始化一个项目的目录,再配置local级别的信息,这里可以使用Git安装好后的,git默认提供的bash窗口。
在此窗口中,能够使用类似Linux的操作命令。
$ pwd
/d/2025/Git
$ ls -a
./ ../
$ git init git_learning
Initialized empty Git repository in D:/2025/Git/git_learning/.git/
$ cd git_learning/
$ ls -al
total 4
drwxr-xr-x 1 heath 197121 0 Jun 22 09:59 ./
drwxr-xr-x 1 heath 197121 0 Jun 22 09:59 ../
drwxr-xr-x 1 heath 197121 0 Jun 22 09:59 .git/
$ git config --global --list
user.name=xgg996
user.email=229405623@qq.com
credential.https://gitee.com.provider=generic
credential.http://192.168.30.77.provider=generic
http.proxy=http://127.0.0.1:7890
https.proxy=http://127.0.0.1:7890
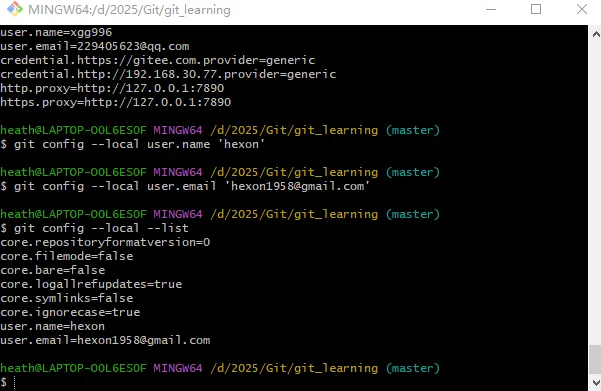
$ git config --local user.name 'hexon'
$ git config --local user.email 'hexon1958@gmail.com'
$ git config --local --list
core.repositoryformatversion=0
core.filemode=false
core.bare=false
core.logallrefupdates=true
core.symlinks=false
core.ignorecase=true
user.name=hexon
user.email=hexon1958@gmail.com至此,我们初始了一git_learning的目录并且关联了一个本地的Git仓库并配置了local级别user.nameuser.email信息(注意:这里使用了新的用户名和邮箱,与global的信息是不一样的)。下面我们往目录中添加一些内容,并进行一次提交。提交后再看看在global级别和local级别配置了不同user.nameuser.email后,最终的提交效果是怎样的。
$ pwd
/d/2025/Git/git_learning

$ touch readme

$ ls -a
./  ../  .git/  readme

$ git commit -m'Add readme'
On branch master

Initial commit

Untracked files:
  (use "git add <file>..." to include in what will be committed)
        readme

nothing added to commit but untracked files present (use "git add" to track)

$ git add readme

$ git status
On branch master

No commits yet

Changes to be committed:
  (use "git rm --cached <file>..." to unstage)
        new file:   readme


$ git commit -m'Add readme'
[master (root-commit) 695a4fc] Add readme
 1 file changed, 0 insertions(+), 0 deletions(-)
 create mode 100644 readme

$ git log
commit 695a4fc77a3be0dcfbf1c91cb86edb864ea4fe00 (HEAD -> master)
Author: hexon <hexon1958@gmail.com>
Date:   Sun Jun 22 10:10:21 2025 +0800

    Add readme
我们创建了一个reademe文件,然后直接提交时报错了,这是因为git有暂存区的概念(后面学习),我们使用 git add 命令将本地的修改添加到暂存区,再次重新commit就成功了。通过 git log 查看日志,可以看到Author的信息都是我们在local级别设置的。因此,local的配置可以用于覆盖gloabl的配置,如果是在自己电脑上操作公司的代码时这个还是有用的。
辅助配置
方便访问Github,进行代码学习,可以配置:
# 设置 HTTP/HTTPS
git config --global http.proxy http://127.0.0.1:7890
git config --global https.proxy http://127.0.0.1:7890

# 取消
git config --global --unset http.proxy
git config --global --unset https.proxy